Verify & Anchor Images
- Make sure all requirements above are met.
- Login as an admin into the target Windows computer.
- Connect the LLIMAGER-win drive containing
LLIMAGERW.exeand the license key file (llimagerw.lic). - On your USB drive, navigate to
\llimagerand double-clickLLIMAGERW.exe, then select Verify & Anchor Images from the Home screen.
License requirement: Verify & Anchor Images requires a Standard license. Under a Trial or Portal-Trial license, selecting this module displays a message stating the feature requires a Standard license. See Licensing.
This module opens an E01 Verification screen used to independently verify a previously acquired E01 image against its embedded hash, and to produce a fresh, signed verification report. The report includes a QR with relevant metadata for subsequent registering purposes.
What this module does: opens the selected E01, reads all embedded metadata, verifies the stored hash (MD5/SHA-1/SHA-256), computes a fresh SHA-256, and produces a signed and sealed forensic report. For split E01s, select the first segment (e.g., .E01).
About the "Anchor" step: this module verifies the image and produces a signed report — it does not itself submit anything to the blockchain. Anchoring to the LLSmartVerify blockchain is always performed through the LLSmartVerify Portal (typically after the resulting report's QR code is scanned and registered via the LLIMAGER Companion mobile app). This is consistent across the suite: Disk Image, Targeted Collection, and Dead Box acquisitions are anchored the same way, through the Portal — none of the Home screen modules anchor directly.
Step-by-Step Walkthrough
Step 1 — Select the E01 and Enter Case Details
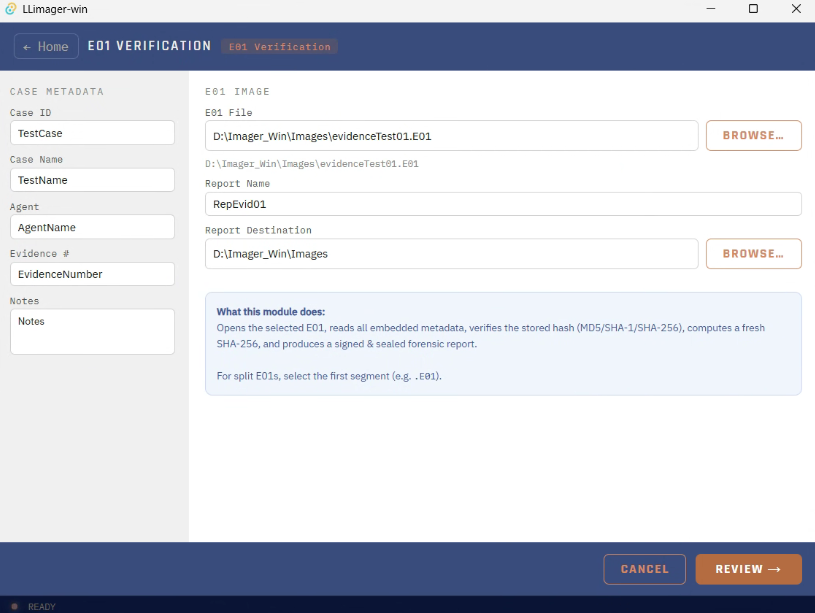
- Fill in Case Metadata: Case ID, Case Name, Agent, Evidence #, Notes.
- Click Browse… next to E01 File and select the image to verify (filters to
.E01/.e01). The Report Name is pre-filled from the E01 filename. - Select a Report Destination.
- Click Review.
Step 2 — Review
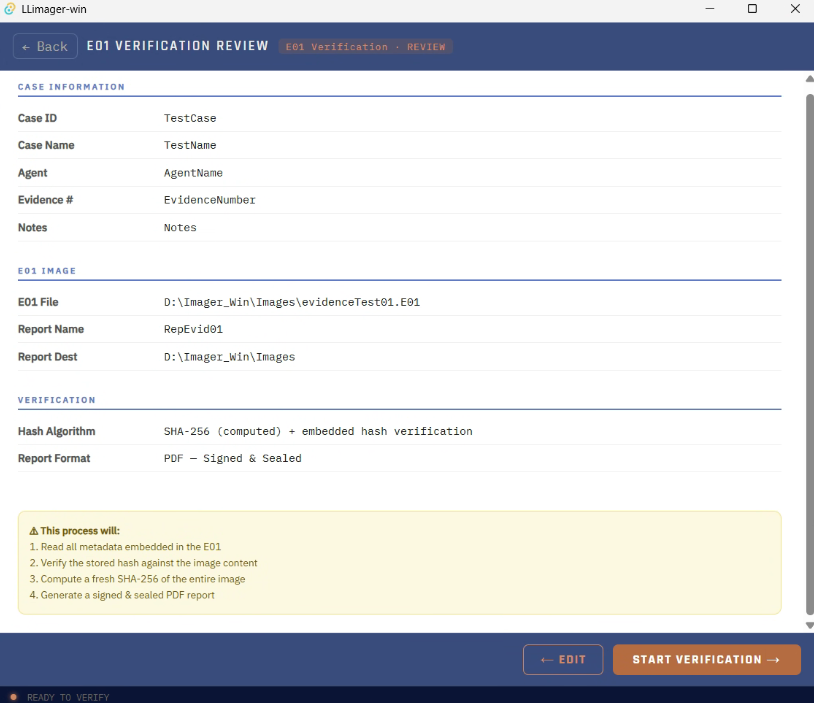
The review screen summarizes:
- Case Information — Case ID, Case Name, Agent, Evidence #, Notes.
- E01 Image — E01 file path, report name, report destination.
- Verification — hash algorithm (SHA-256 computed, plus embedded hash verification) and report format (PDF, signed and sealed).
A warning box confirms what will happen: the tool will read all metadata embedded in the E01, verify the stored hash against the image content, compute a fresh SHA-256 of the entire image, and generate a signed and sealed PDF report.
Click Start Verification to begin.
Step 3 — Verification in Progress
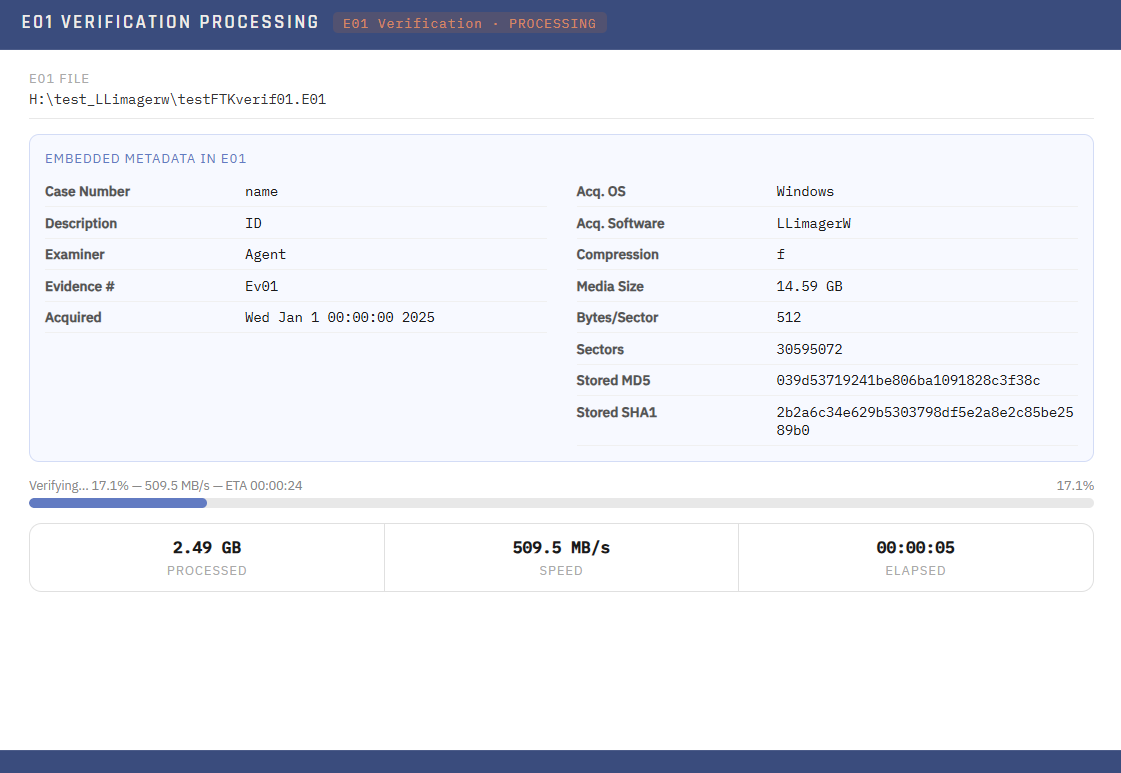
The processing screen first reads and displays the metadata embedded in the E01, including:
| Field | Description |
|---|---|
| Case Number, Description, Examiner, Evidence #, Notes | Metadata captured at acquisition time |
| Acquired (date) | Original acquisition timestamp |
| Acq. OS | Operating system used for the original acquisition |
| Acq. Software | LLIMAGER-win / LLIMAGER Linux version used |
| Compression | Compression type/level used in the E01 |
| Media Size, Bytes/Sector, Sectors | Physical disk geometry |
| Stored Hash(es) | Hash value(s) embedded at acquisition time |
It then verifies the image, showing overall progress, transfer speed (MB/s), elapsed time, and bytes processed.
Step 4 — Verification Result
On completion, one of three outcomes is shown:
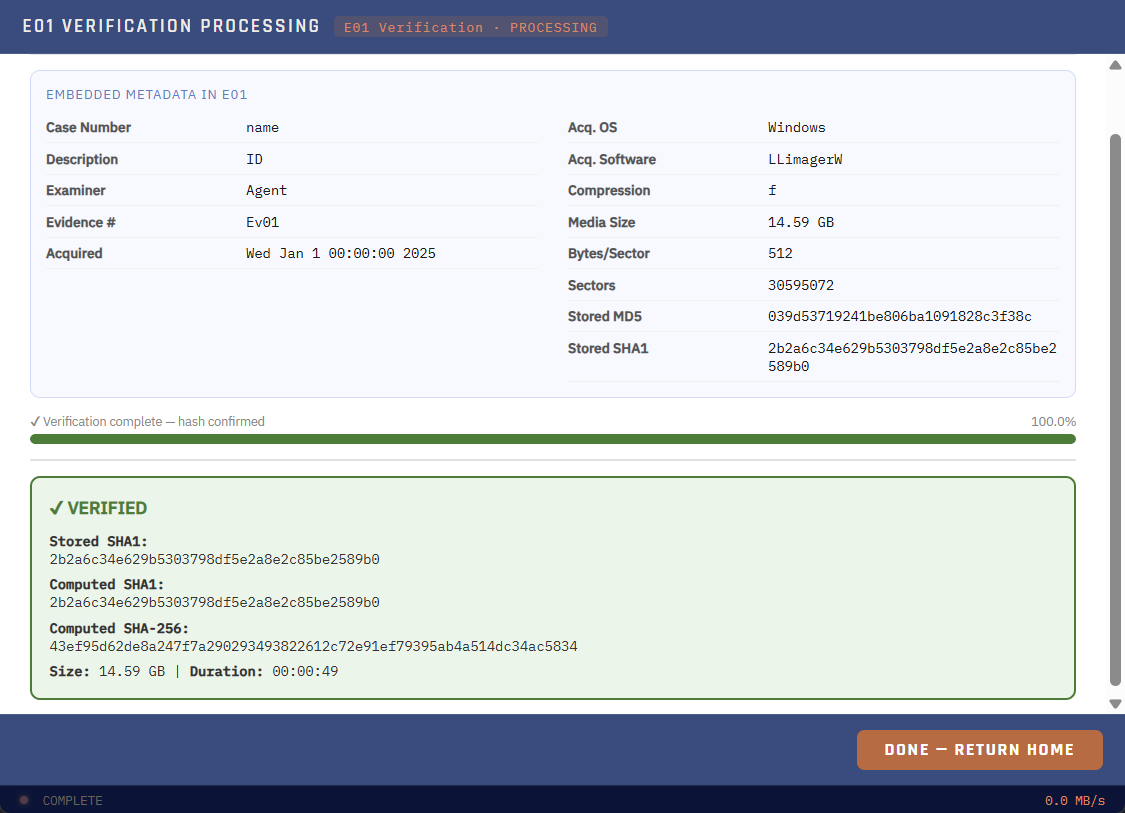
- ✔ VERIFIED (green) — the freshly computed hash matches the stored hash embedded in the E01.
- ✘ HASH MISMATCH (red) — the freshly computed hash does not match the stored hash. Treat this as a potential integrity issue requiring investigation.
- ⚠ NO STORED HASH (amber) — no embedded hash was found to compare against; a SHA-256 was computed and recorded, but no comparison could be made.
The result panel displays the stored hash, the freshly computed hash (same algorithm), the computed SHA-256, image size, and verification duration. A signed and sealed PDF report is generated automatically.