Booting the Dead-Box USB & Using LLIMAGER Linux
This page covers the bootable side of the LLIMAGER-win dead-box USB drive: the two ISOs it carries, the Ventoy boot menu you'll see when the target machine boots from it, and the full screen-by-screen walkthrough of LLIMAGER Linux itself once it launches. For the reference lookup of boot keys per device brand/model, see Dead Box Imaging (Linux Boot); this page picks up from "insert the USB and power on."
Two ISOs, One USB
The dead-box USB drive carries two bootable ISOs, managed by Ventoy so either can be selected at boot time without re-flashing the drive. They serve two very different purposes:
-
llimager-forensic.iso— boots a full Debian-based live Linux environment and launches LLIMAGER Linux, the acquisition application. This is the ISO you use to actually image a disk (Full Disk or Targeted Collection), whether or not the source disk is BitLocker-protected. -
BitLocker-Recovery-ID.iso— boots a minimal, purpose-built Windows PE environment whose only job is to read and display the BitLocker Recovery ID of any BitLocker-protected disk attached to the machine. It does not image anything. The Recovery ID it shows is not the Recovery Key itself — it's a short identifier used to look up the full Recovery Key stored in your organization's Microsoft 365 / Entra ID (Azure AD) or on-premises Active Directory.
Which ISO Do I Boot?
- If the Recovery Key is already known, or the disk isn't BitLocker-protected, or you intend to acquire the disk in its encrypted/raw state — skip
BitLocker-Recovery-ID.isoentirely and boot straight intollimager-forensic.iso. Forensic best practice is to image a BitLocker disk encrypted first and apply the key later during analysis, rather than unlocking it on-site. - If a BitLocker-protected disk is present and the Recovery Key is not yet known — boot
BitLocker-Recovery-ID.isofirst, read off the Recovery ID, hand it to your IT/sysadmin contact to look up the matching Recovery Key in M365/Entra ID or Active Directory, then reboot intollimager-forensic.isoto continue with the acquisition (with the key in hand, if you want a decrypted image, or without it, if you're imaging encrypted).
LLIMAGER Linux performs its own BitLocker detection and Recovery ID lookup automatically when you select a locked disk — BitLocker-Recovery-ID.iso is a fallback for the rarer case where that in-app lookup can't parse the disk's BitLocker metadata directly. If LLIMAGER Linux is already showing you a Recovery ID, there is no need to reboot into the other ISO.
The Ventoy Boot Menu
Once the target machine boots from the USB drive, Ventoy presents a menu listing the two ISOs:
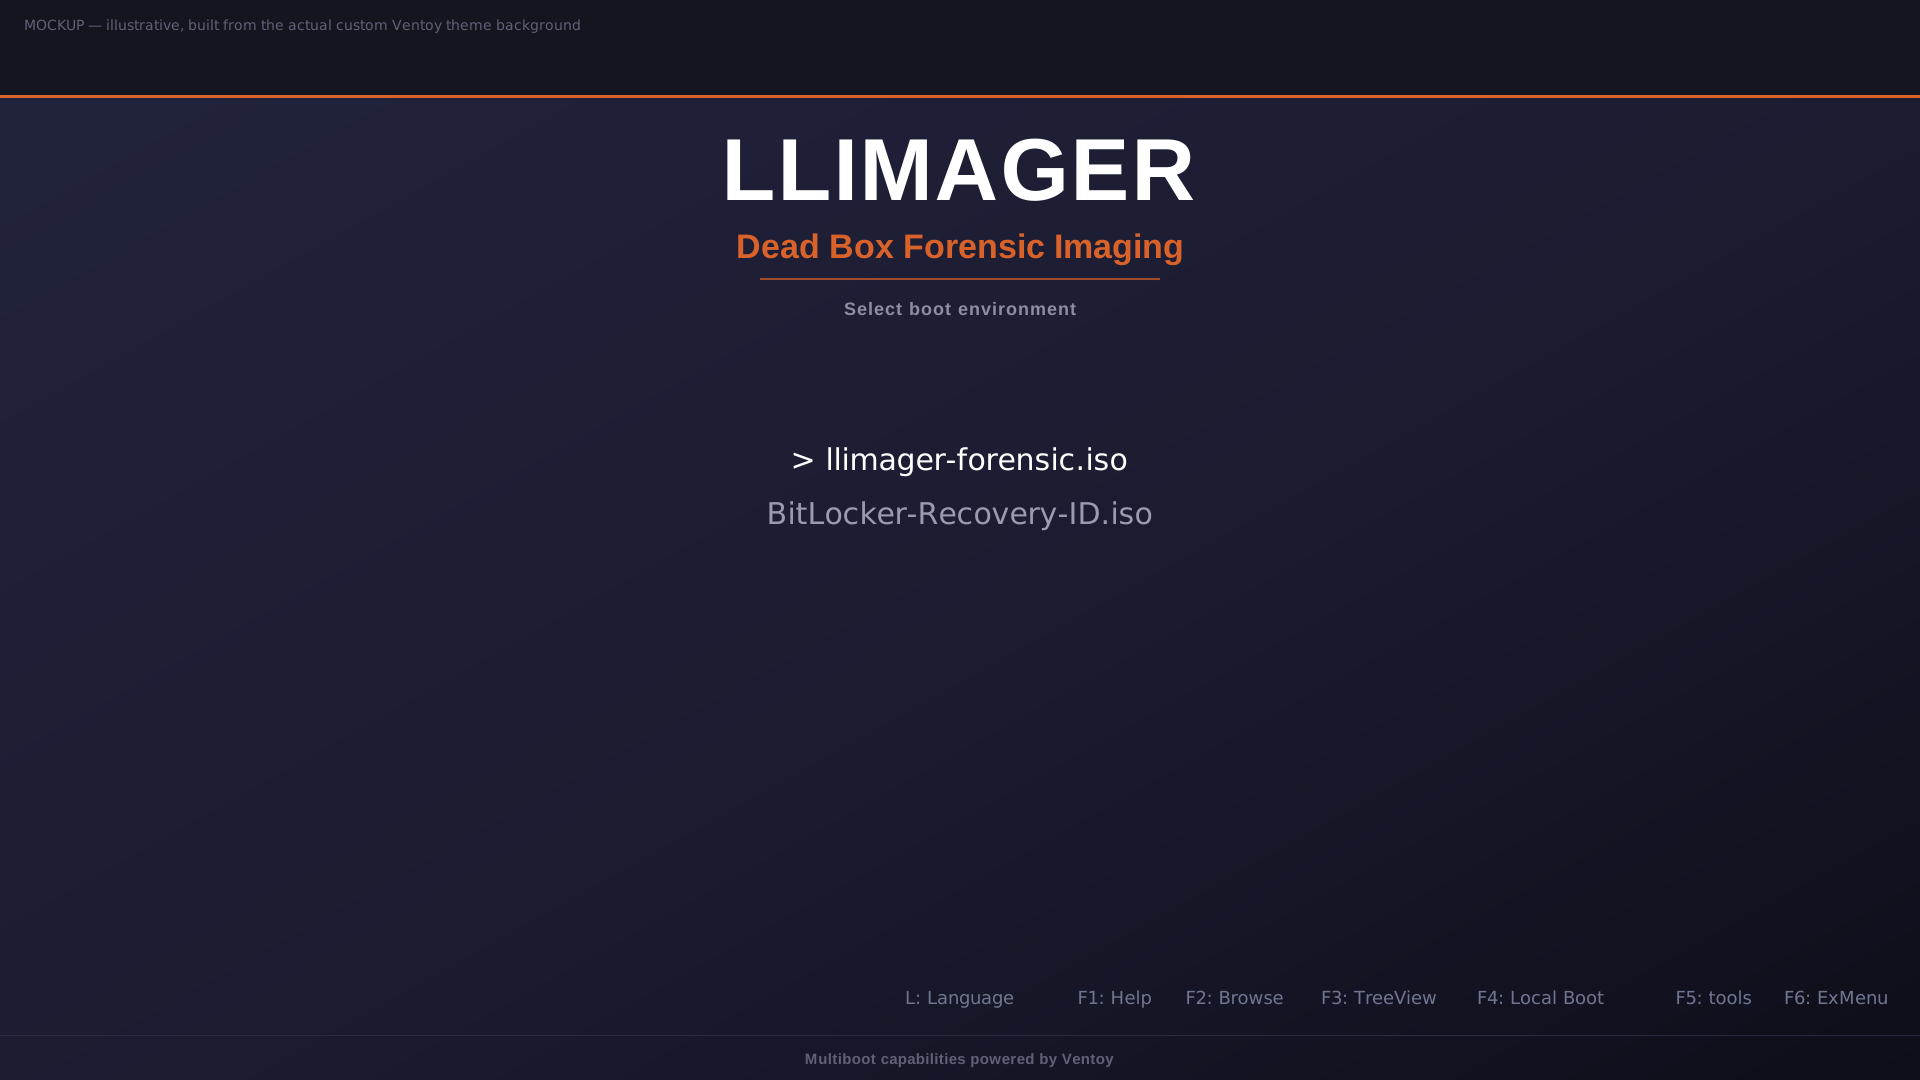
Use the arrow keys to highlight the ISO you want, then press Enter to open its boot-mode submenu (see below), or select it and press Enter twice to boot straight in with Normal Mode.
This isn't a Ventoy manual, but briefly, the row of hotkeys at the bottom of this screen does the following:
- L — Language: changes the menu's display language.
- F1 — Help: opens Ventoy's own built-in help/about screen.
- F2 — Browse: opens a file browser to boot an ISO that isn't in the main list (not needed here — both ISOs are already listed).
- F3 — TreeView: toggles the list between a flat list and a folder tree view, useful when many ISOs are organized into subfolders.
- F4 — Local Boot: exits the Ventoy menu and boots the machine's own installed operating system instead of an ISO. Do not use this for a dead-box acquisition — it defeats the purpose by starting the target's own OS.
- F5 — Tools: opens Ventoy's plugin/tools menu (disk info, system info, and similar utilities).
- F6 — ExMenu: switches to Ventoy's alternate ("extended") menu layout.
For anything beyond this brief summary, refer to Ventoy's own documentation.
Boot-Mode Submenu
Pressing Enter on either ISO opens a short submenu of boot modes for that specific ISO:
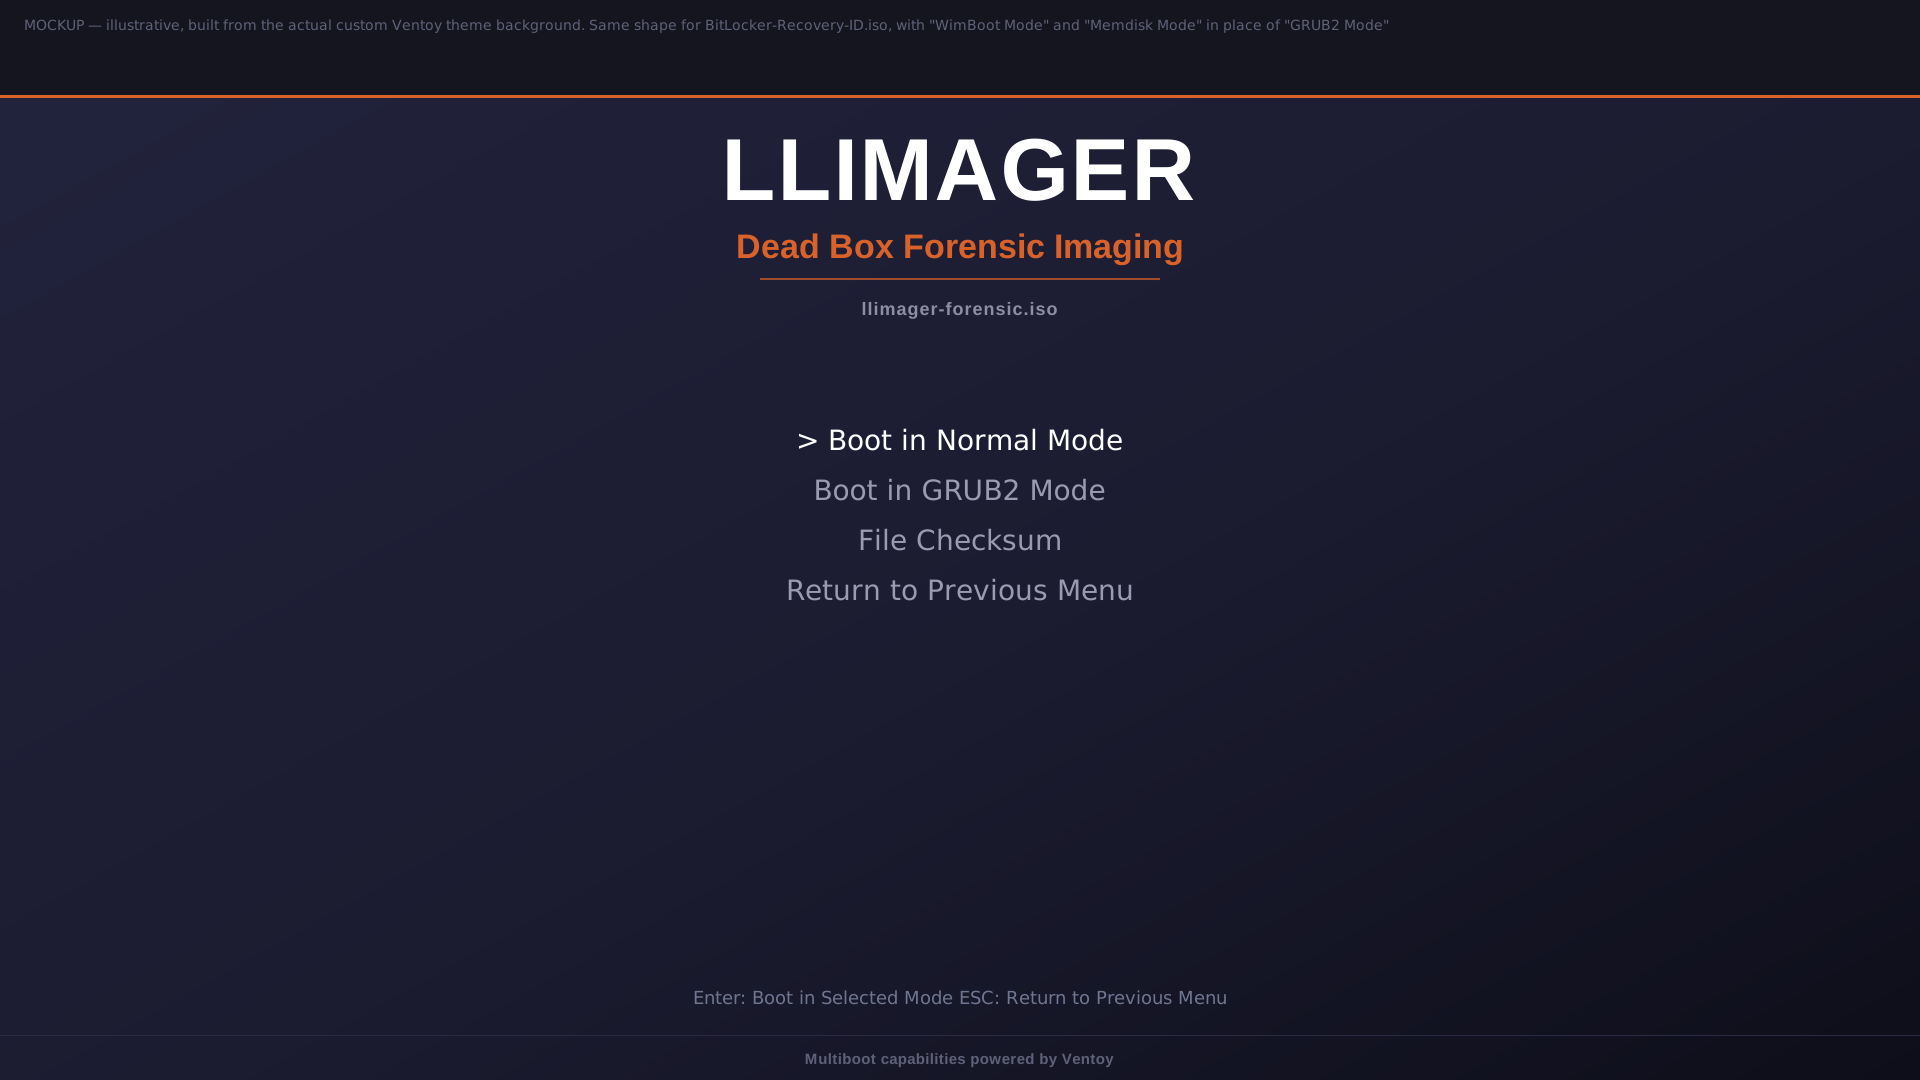
For llimager-forensic.iso:
- Boot in Normal Mode — the default and recommended option; boots the Linux live environment directly.
- Boot in GRUB2 Mode — an alternate boot path through Ventoy's own GRUB2 chain-loading; only needed as a fallback if Normal Mode fails to boot on a particular machine.
- File Checksum — computes and displays a hash of the ISO file itself, letting you confirm the ISO on the USB hasn't been corrupted. This checks the boot media, not any acquired disk image.
- Return to Previous Menu — goes back to the ISO selection screen.
For BitLocker-Recovery-ID.iso:
- Boot in Normal Mode — the default and recommended option.
- WimBoot Mode — Ventoy's Windows-specific boot method for WIM-based images like this one; a fallback if Normal Mode doesn't boot on certain firmware.
- Memdisk Mode — loads the entire ISO into RAM before booting; slower to start and uses more memory, but is more compatible with strict or older BIOS-mode firmware when the other modes fail.
- File Checksum and Return to Previous Menu — same as above.
In both cases, Normal Mode is the right choice almost every time. The other modes exist purely as compatibility fallbacks for machines that fail to boot normally.
What Happens When You Boot Each ISO
Booting BitLocker-Recovery-ID.iso
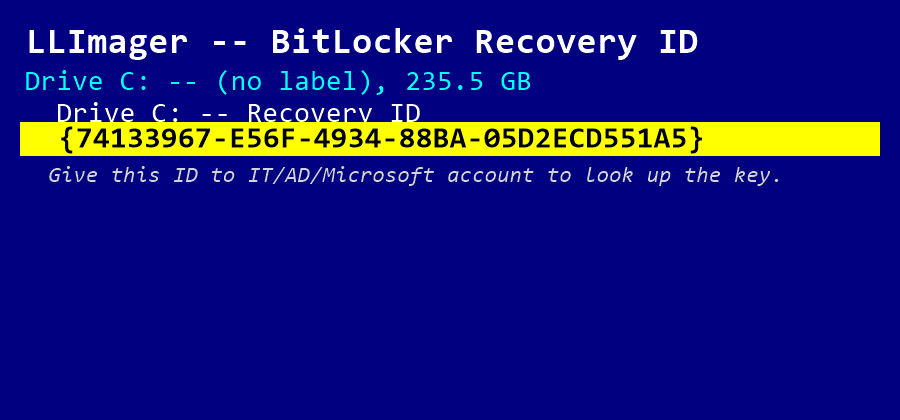
The machine boots into a minimal WinPE environment (never the target's own installed Windows). As soon as it starts, the terminal displays a short banner explaining its single purpose, then automatically queries every disk attached to the machine for BitLocker metadata. For each BitLocker-protected disk found, it displays:
- The disk/volume identifier
- The Recovery ID (and any other protector type present, such as a password protector)
The results are also saved automatically: if a partition labeled for LLIMAGER is attached (the same USB this ISO booted from, or a case evidence drive prepared the same way), a text file and a screenshot of the results are written to it — so the Recovery ID can be handed off without retyping anything, and llimager-forensic.iso's own BitLocker unlock panel will pick up that saved file automatically later (see "Found on llimager partition" below).
Once you have the Recovery ID(s) you need, shut down or reboot the machine and select llimager-forensic.iso from the Ventoy menu to continue.
Booting llimager-forensic.iso
The machine boots into a full Debian-based live Linux environment. LLIMAGER Linux launches automatically once the environment is ready, and the Home screen appears — see the walkthrough below. The target machine's own installed operating system is never started, and the internal disk is never mounted read-write.
LLIMAGER Linux — Detailed Walkthrough
The Home Screen
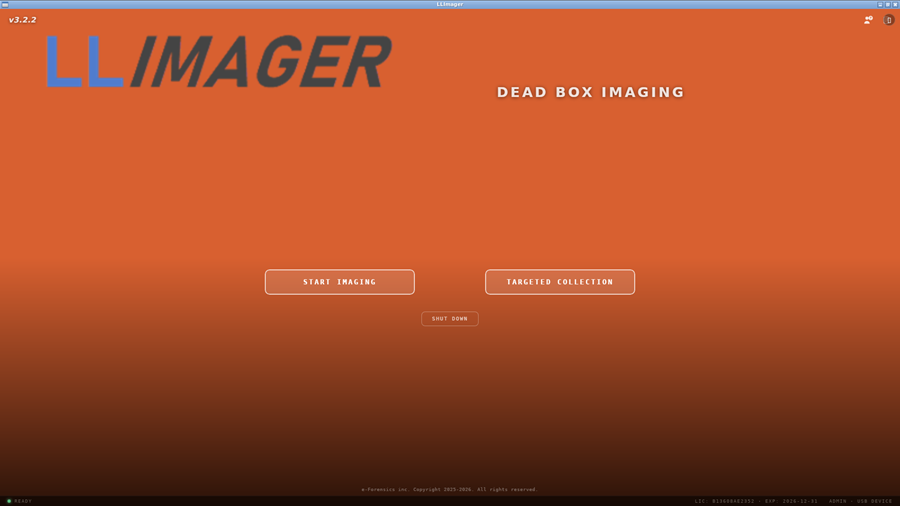
Once LLIMAGER Linux launches, it presents a Home screen with two primary actions, plus About/Manual buttons and a Shut Down control:
| Button | Purpose |
|---|---|
| Start Imaging | Full-disk (system volume) acquisition — the Linux-side equivalent of LLIMAGER-win's Disk Image |
| Targeted Collection | Logical acquisition of selected files/folders — the same workflow as LLIMAGER-win's Targeted Collection |
The status bar at the bottom shows the current license type (Trial / Portal Trial / the licensed serial), matching the same license tiers and Trial restrictions (masked hashes, "not valid for evidentiary use" marking) used by LLIMAGER-win — see Licensing. Use Shut Down to power off the machine cleanly once you're done, rather than pulling power.
Start Imaging (Full Disk)
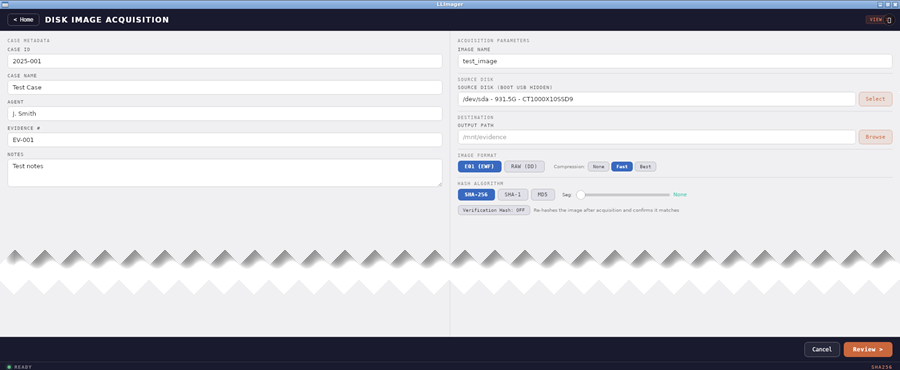
This option performs a full-disk acquisition, imaging the target's storage device directly to E01 (EWF) format via ewfacquire, or to a raw DD image via ddrescue as a fallback for damaged/unstable disks. The process includes hash calculation and generation of a signed, tamper-evident PDF acquisition log with an embedded QR code — the same as LLIMAGER-win's Disk Image output.
- Enter an Image Name.
- Select the source disk. Click Select to open the Select Source Disk list — the boot USB itself is hidden from this list so it can't be selected by mistake. Each entry shows the device path, size, and model/transport type.
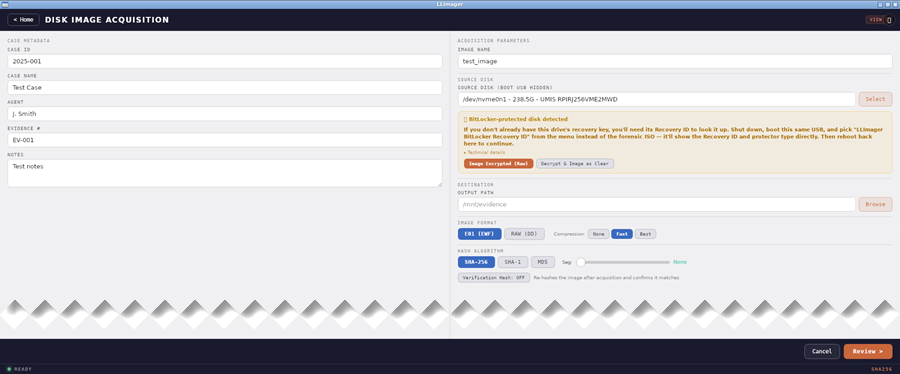
- If the selected disk is BitLocker-protected, a panel appears automatically showing its Recovery ID(s) (for handoff to IT/sysadmin lookup) and a choice between Image Encrypted (Raw) — the recommended default — and Decrypt & Image as Clear, which requires entering the Recovery Key or password, either typed in, browsed to as a key file, or picked with one click if it was already found on an attached
llimager-labeled partition (including one saved byBitLocker-Recovery-ID.iso, per above). An Unlock button verifies the key before proceeding. - If the Recovery ID can't be read directly, the panel explains this and points you to
BitLocker-Recovery-ID.isoas the fallback lookup path described earlier on this page.
- If the selected disk is BitLocker-protected, a panel appears automatically showing its Recovery ID(s) (for handoff to IT/sysadmin lookup) and a choice between Image Encrypted (Raw) — the recommended default — and Decrypt & Image as Clear, which requires entering the Recovery Key or password, either typed in, browsed to as a key file, or picked with one click if it was already found on an attached
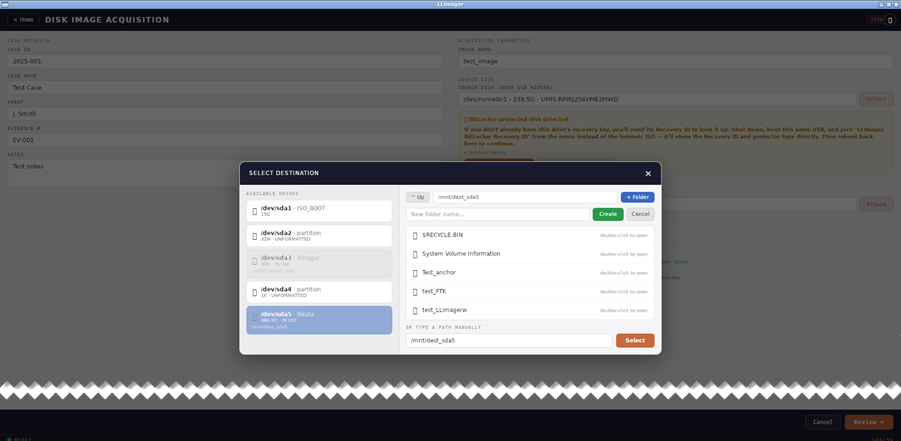
- Select the destination path for the image.
- Choose the image format — E01 (EWF) or RAW (DD) — and, for E01, a compression level (None / Fast / Best).
- Choose the hash algorithm (SHA-256, SHA-1, or MD5) and, optionally, a segment size to split the image into fixed-size chunks (or "None" for a single continuous file).
- Optionally enable Verification Hash to re-hash the completed image and confirm it matches, as a second pass after acquisition.
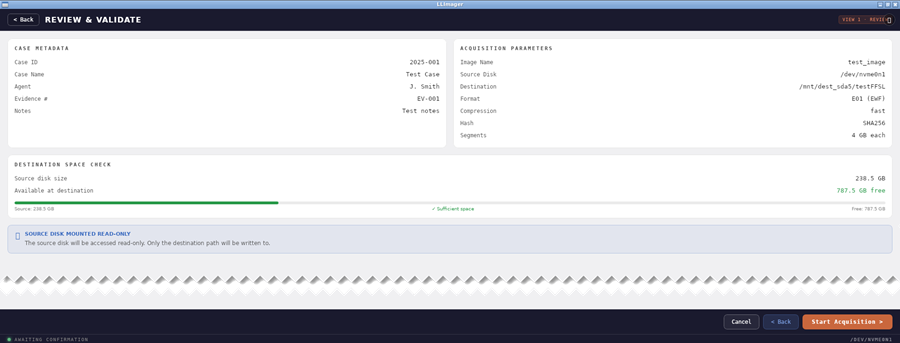
- Click Review to open the Review screen and confirm the case metadata (Case ID, Case Name, Agent, Evidence #, Notes) and acquisition settings.
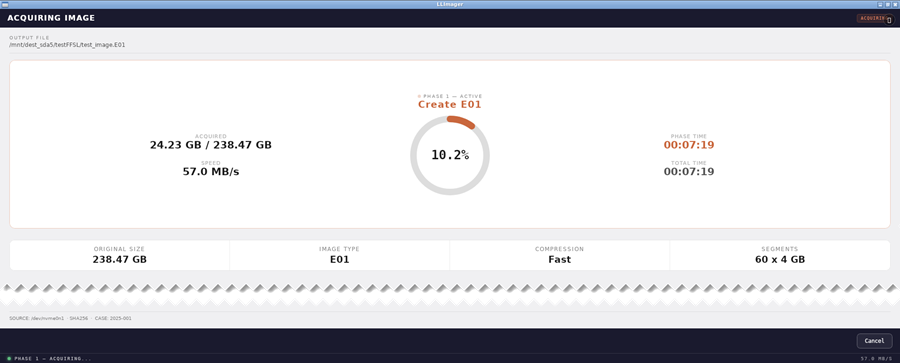
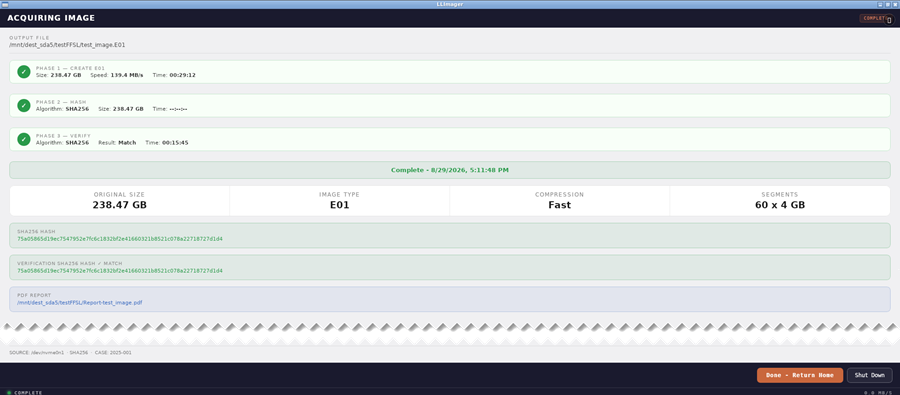
- Click Process to begin. The Acquiring Image screen shows each phase as it runs, with a live progress gauge, transfer speed, and elapsed time:
- Phase 1 — Acquiring (E01/DD creation)
- Phase 2 — Hashing
- Phase 3 — Verifying (only shown if Verification Hash was enabled)
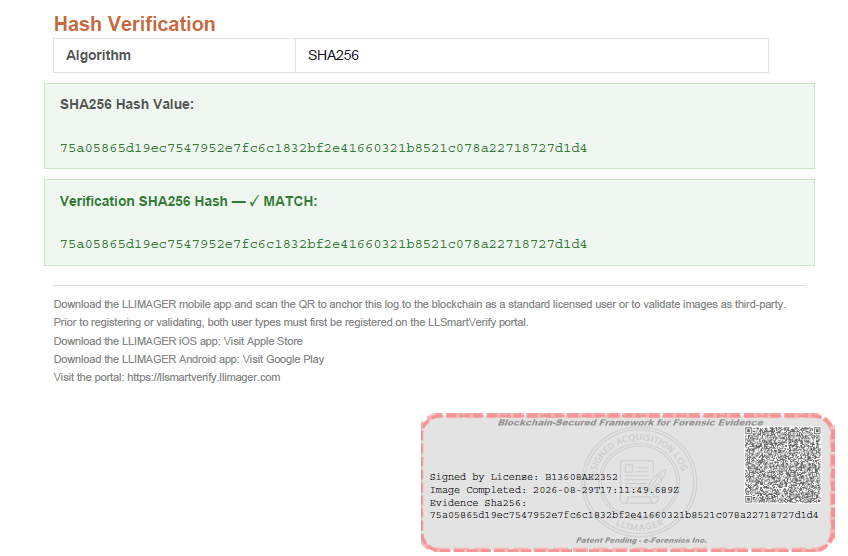
- On completion, the calculated hash is displayed and a signed, tamper-evident PDF acquisition log is generated automatically, matching the format produced by LLIMAGER-win.
Note: anchoring the report's hash to the LLSmartVerify blockchain is not performed by LLIMAGER Linux directly — it happens through the LLSmartVerify Portal, typically after the report's QR code is scanned and registered via the LLIMAGER Companion mobile app.
Targeted Collection
Enables targeted logical imaging of specific files and folders to a compressed ZIP container while computing cryptographic hash values, with the same granular filtering and signed PDF reporting as LLIMAGER-win's Targeted Collection.
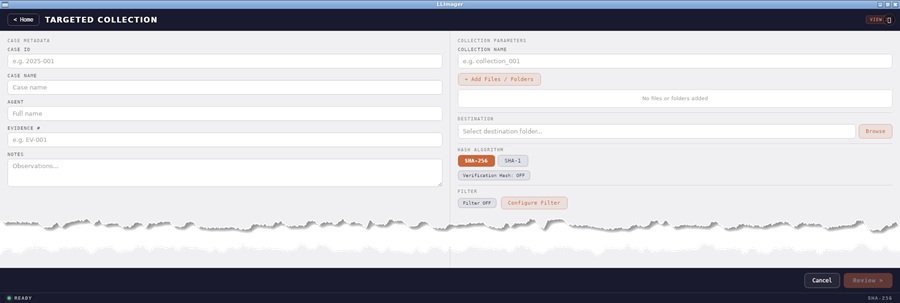
Step 1 — Start a New Collection
Click Targeted Collection on the Home screen.
Step 2 — Fill in Case Metadata
| Field | Description | Required |
|---|---|---|
| Case ID | Your organization's case identifier | No |
| Case Name | Your organization's case name | No |
| Agent | Name of collecting officer / agent | No |
| Evidence # | Unique evidence item identifier | No |
| Notes | Additional context or observations | No |
Step 3 — Add Source Files & Folders
Click + Add Files / Folders to open the source browser:
- The left panel lists available drives, each tagged with its size and status (IMAGING SOURCE, IN USE, or UNFORMATTED as applicable), with an eject control for external mounted drives.
-
Selecting a drive opens its file system in the right panel — navigate with Up, open folders, and check individual files/folders to add them, or type a path manually.
-
If the selected drive is BitLocker-protected, the same unlock panel described under Start Imaging appears before browsing is allowed — Recovery ID display, Recovery Key/Password entry (typed, browsed, or one-click from an
llimager-labeled partition), and an Unlock button. For targeted collections, there will be no way to proceed, the disk file system will not be exposed without the key.
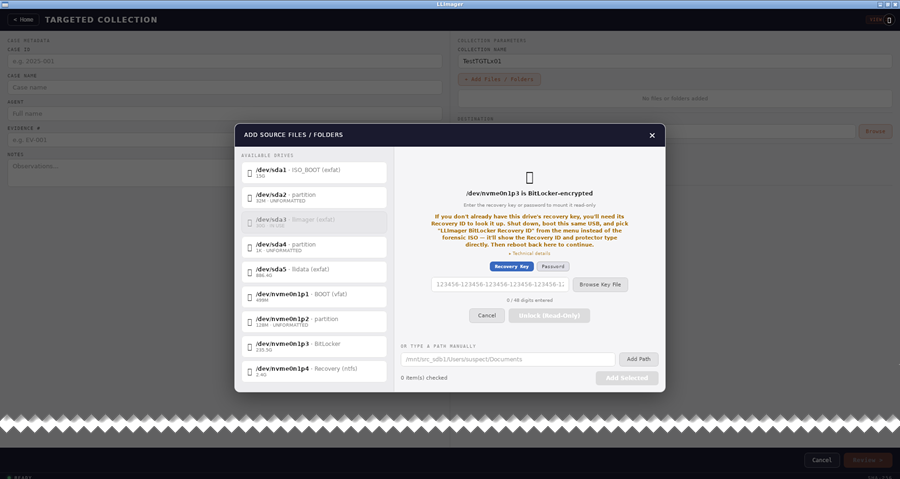
Each item added is size-estimated in the background and shown in a running list with a live total; items can be individually deselected and removed.
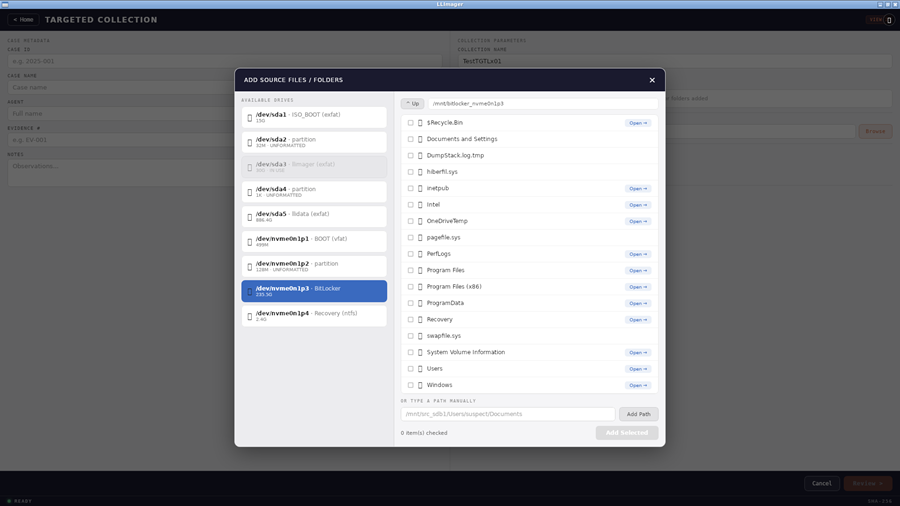
Step 4 — Configure Destination, Hash, and Filter
- Select the destination folder for the resulting ZIP archive.
- Choose the hash algorithm (SHA-256 or SHA-1), and optionally enable Verification Hash for a second re-hash pass over the finished ZIP.
- Optionally configure a filter by file extension (spreadsheets, documents, multimedia, or custom) and/or filesystem date range (Created, Modified, Last Accessed).
Step 5 — Review and Process
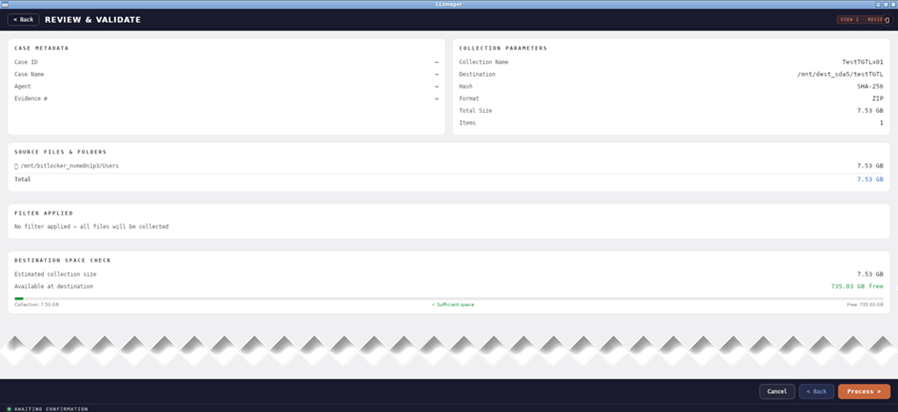
- Click Review to open the Review & Validate screen and confirm the summary: case metadata, collection parameters (name, destination, hash algorithm, item count, total size), the full list of source items, any filter applied, and a destination space check.
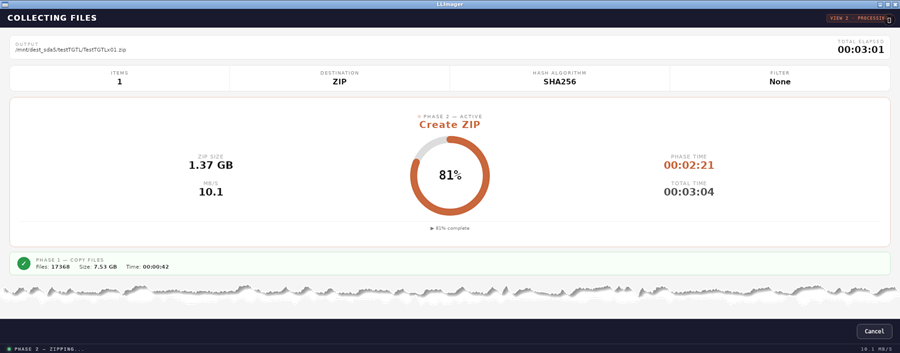
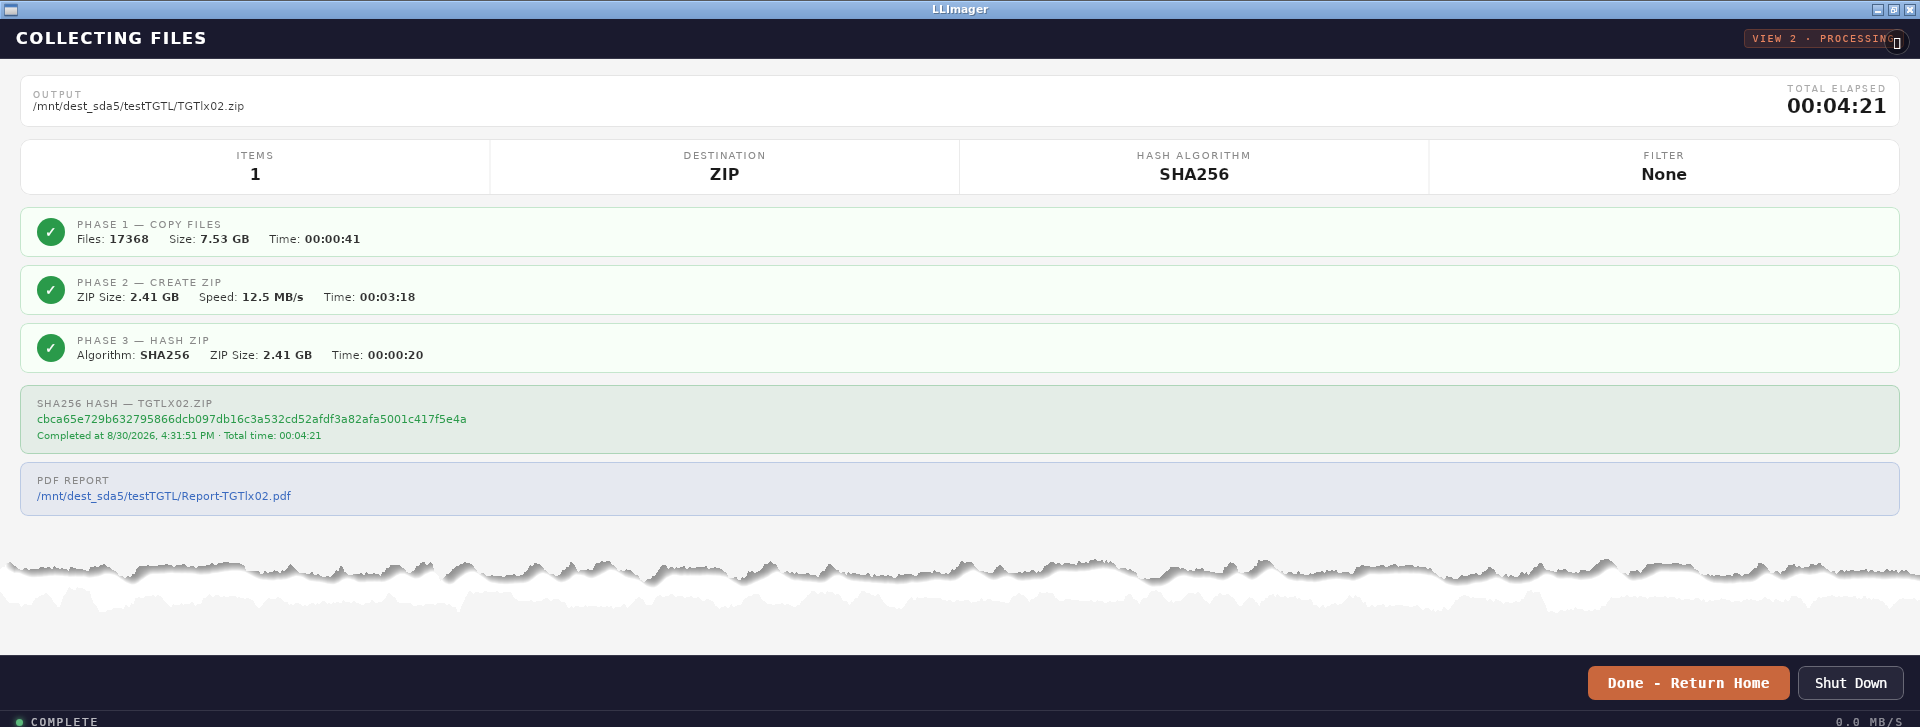
- Click Process to begin. The Collecting Files screen displays three sequential phases, each with a live progress gauge, current file, transfer speed, and elapsed time:
- Phase 1 — Copying
- Phase 2 — Zipping
- Phase 3 — Hashing
- If Verification Hash was enabled, a fourth card shows the re-hash result (match/mismatch) once complete.
- On completion, the calculated hash is displayed along with total duration, and a signed, tamper-evident PDF acquisition log with embedded QR code is generated automatically.
Note: as with Start Imaging, anchoring the report's hash to the LLSmartVerify blockchain happens through the LLSmartVerify Portal, not within LLIMAGER Linux itself.