Installation / Getting Started with LLIMAGER-win
LLIMAGER-win ships as a portable application and requires no installation on the target machine. Follow the applicable scenario below.
Native (Live) Acquisition Setup
- Login as an admin into the target Windows computer and connect the LLIMAGER-win USB drive containing the imager executable and license key file.
- Connect the destination disk(s) — refer to the Requirements section for sizing guidance.
- Open File Explorer to confirm the drive letters assigned to the LLIMAGER-win USB and the destination USB.
- On the LLIMAGER-win USB drive, navigate to the
\llimagerwfolder and double-clickLLimagerw.exe.
The Home Screen
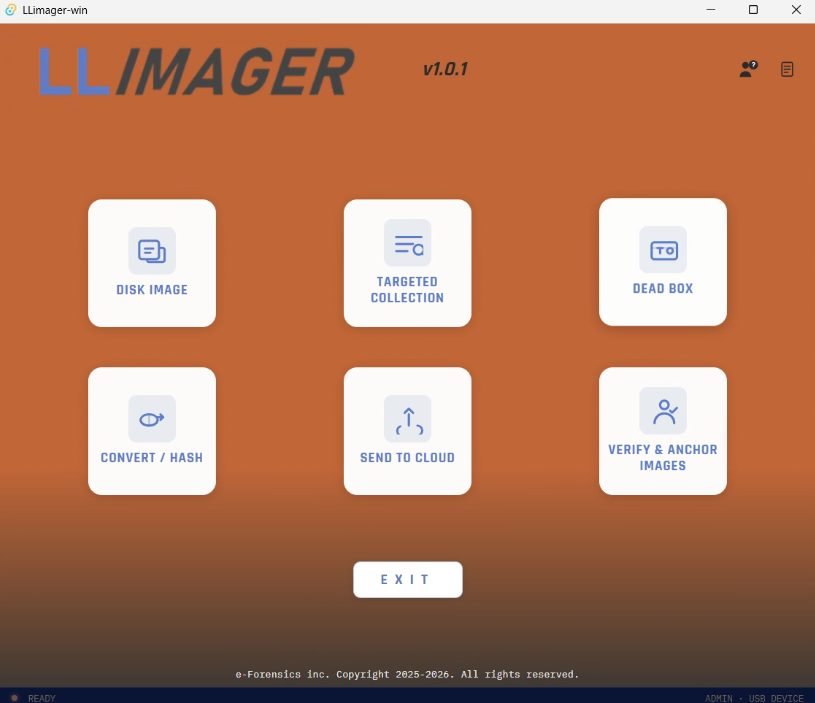
Once launched, LLIMAGER-win presents a Home screen with six module icons:
| Module | Purpose |
|---|---|
| Disk Image | Full-disk (system volume) acquisition to E01/DD |
| Targeted Collection | Logical acquisition of selected files/folders |
| Dead Box | Opens the Dead Box Imaging screen — overview, per-device boot instructions, and imaging configuration for host-untouched acquisitions |
| Convert/Hash | Convert or hash an existing image |
| Send to Cloud | Upload a completed image or any file/folder to AWS, Google Cloud, or Azure |
| Verify & Anchor Images | Verify an existing E01 integrity and anchor it to the LLSmartVerify blockchain |
LLIMAGER-win Home Screen Modules
Disk Image (#disk-image)
This option performs a full-disk (system volume) acquisition, imaging the computer's hard disk directly to E01 (EWF) format using ewfacquire, or to a raw DD image via ddrescue for damaged/unstable disks. The process includes hash calculation and generation of a signed, tamper-evident PDF acquisition log with embedded QR code.
Targeted Collection (#targeted-collection)
Enables targeted logical imaging of specific files and folders to a compressed container while computing cryptographic hash values. Features granular filtering by file extension and filesystem timestamps, and automatically generates a signed, tamper-evident PDF acquisition log with an embedded QR code.
Dead Box (#dead-box)
Opens the Dead Box Imaging screen (Standard license only): an overview of the dead-box method showing a per-device boot instruction lookup. The actual reboot and acquisition happen independently, in the LLIMAGER Linux live environment — see Dead Box Imaging (Linux Boot).
Convert/Hash (#convert-hash)
Two tools in one screen (Standard license only): Hash Files, which computes and logs hash values for arbitrary files/folders, and Convert DD→E01, which converts a raw DD/RAW/IMG image into a compressed E01 container. See Convert/Hash.
Send to Cloud (#send-to-cloud)
Uploads a completed image, or folder(s) or file(s) to AWS, Google Cloud, or Microsoft Azure using authentication keys, with the option to securely save credentials for future uploads (Standard license only). See Send to Cloud.
Verify & Anchor Images (#verify-anchor-images)
Opens the E01 Verification screen (Standard license only): reads an E01's embedded metadata, verifies its stored hash, computes a fresh SHA-256, and produces a signed verification report. See Verify & Anchor Images.
Which modules are available depends on your license type — see Licensing. Under a Trial or Portal-Trial license, selecting Dead Box, Convert/Hash, Send to Cloud, or Verify & Anchor Images displays a message stating that the feature is not available under your current license type (rather than silently disabling the icon).
- Proceed to image — see Disk Image or Targeted Collection.
Dead-Box Acquisition Setup (Linux Boot via Ventoy)
Selecting Dead Box on the Home screen (Standard license required) opens the in-app Dead Box Imaging screen, which walks through the process and helps you look up the boot procedure for the target machine's specific brand and model. The actual reboot and acquisition, however, happen independently of LLIMAGER-win:
- In the Dead Box Imaging screen, use the Boot Instructions tab to look up the exact boot key and step-by-step procedure for the target machine's brand and model. This is a reference only, subject to field verification.
- Power off the target machine completely — do not hibernate. Hibernation writes a memory image to disk that can contaminate the acquisition.
- Insert the LLIMAGER-win USB drive (prepared with Ventoy) into the target machine.
- Power on the machine and enter the boot device selection menu (commonly F12, F10, Esc, or a similar key depending on the manufacturer — see Troubleshooting if the boot menu doesn't appear).
- Select the USB drive as the boot device, then the LLIMAGER Linux live ISO entry from the Ventoy menu.
- The machine boots into the Debian-based live environment, and LLIMAGER Linux launches automatically. At this point, LLIMAGER-win's role is complete.
- Inside LLIMAGER Linux, manually enter the case metadata and imaging parameters, then proceed to image. See Dead Box Imaging (Linux Boot) for the full walkthrough, including current limitations of the config-file handoff.
NOTE: If the target machine's Secure Boot settings block the Ventoy USB from booting, temporarily disable Secure Boot in the BIOS/UEFI settings, complete the acquisition, and re-enable Secure Boot afterward if required by your organization's policy.