Dead Box Imaging (Linux Boot)
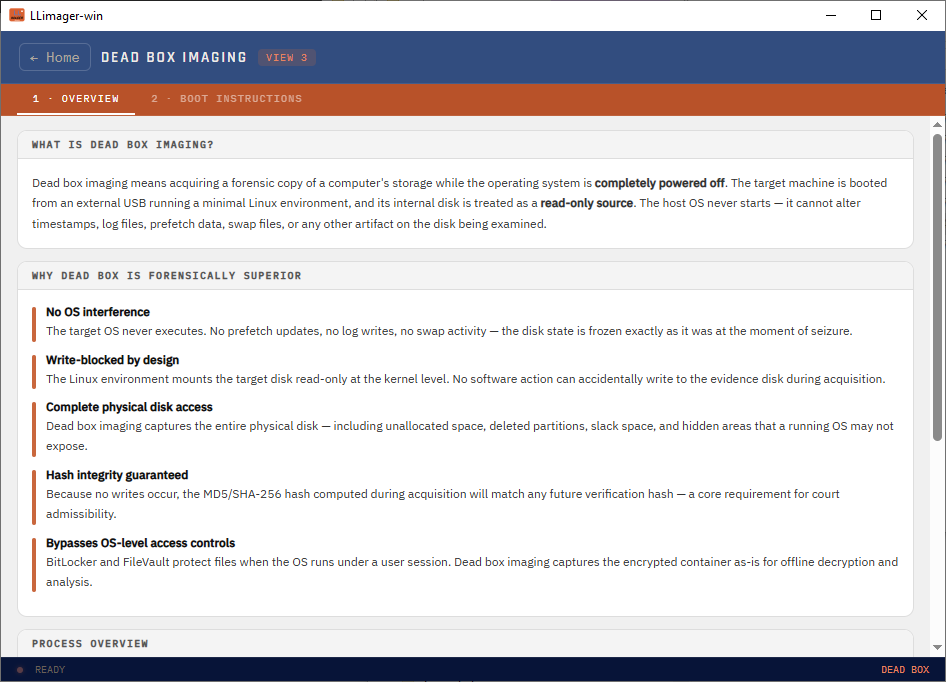
Dead box imaging means acquiring a forensic copy of a computer's storage while the operating system is completely powered off. The target machine is booted from an external USB running a minimal Linux environment, and its internal disk is treated as a read-only source. The host OS never starts — it cannot alter timestamps, log files, prefetch data, swap files, or any other artifact on the disk being examined.
Why Dead Box Is Forensically Superior
- No OS interference — the target OS never executes. No prefetch updates, no log writes, no swap activity; the disk state is frozen exactly as it was at the moment of seizure.
- Write-blocked by design — the Linux environment mounts the target disk read-only at the kernel level. No software action can accidentally write to the evidence disk during acquisition.
- Complete physical disk access — captures the entire physical disk, including unallocated space, deleted partitions, slack space, and hidden areas that a running OS may not expose.
Also Works on Non-Windows Target Machines
Because this method boots an independent Linux environment rather than relying on the target's installed OS, the same USB drive can also be used to image Linux computers and Intel Macs, not just Windows machines. Dead box acquisition may also bypasses OS-level access controls such as BitLocker and FileVault — it can capture the encrypted container as-is for offline decryption and analysis, rather than requiring the volume to be unlocked on-site.
The Dead Box Imaging Screen
Selecting Dead Box from the LLIMAGER-win Home screen (Standard license required) opens the Dead Box Imaging screen, organized into three tabs. This screen prepares an acquisition and provides reference material — it does not itself reboot the machine or perform the acquisition.
Tab 1 — Overview
Summarizes what dead box imaging is and why it's used, followed by a 7-step process outline:
- Look up the boot procedure for the target machine — use the Boot Instructions tab to find the exact key sequence for the target's brand and model.
- Power off the target machine — do not hibernate. The target must be fully powered off; hibernation writes a memory image to disk that can contaminate the acquisition. Always use a full shutdown.
- Insert the USB and boot into Linux — follow the boot procedure from Tab 2. The target OS is never started.
- Acquire the image using LLIMAGER Linux — select the target disk, verify it is read-only, and start acquisition.
- Verify hashes and document — record hash values in your chain of custody documentation before removing the USB or powering off.
Tab 2 — Boot Instructions
Two-column layout:
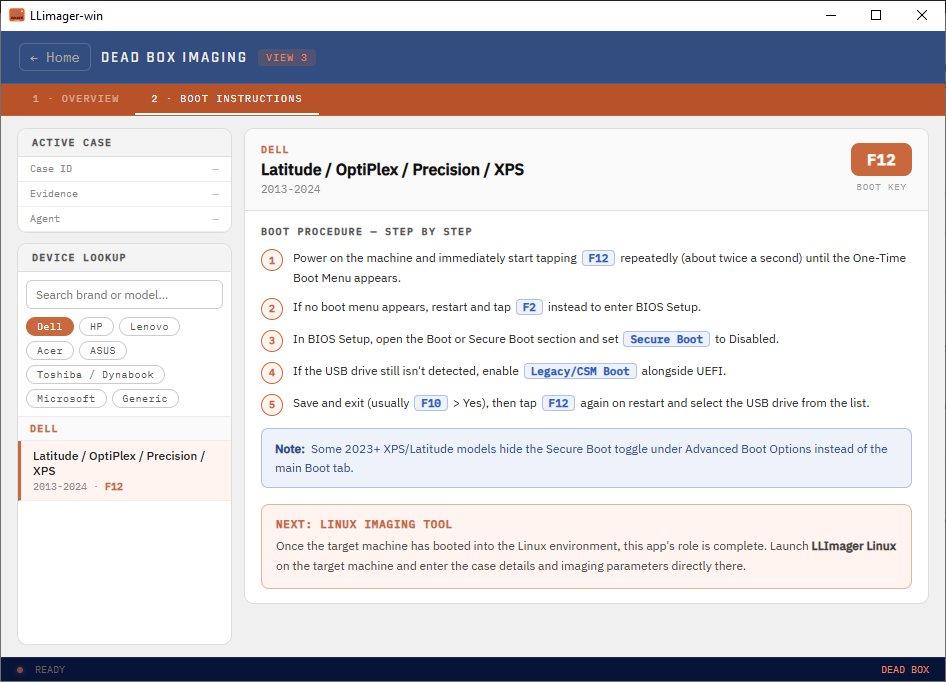
- Left column: an "Active Case" summary (Case ID, Evidence, Agent) carried over from the current session, plus a Device Lookup panel — search by brand or model, filter by brand pill, and browse a device list (grouped by brand) sourced from a built-in reference database of makers/models.
- Right column: once a device is selected, displays its brand, model, years, and boot key in a prominent badge, followed by a numbered Boot Procedure — Step by Step list specific to that device, and any device-specific notes (e.g., Secure Boot considerations).
This lookup is a reference only. Boot key behavior can vary by BIOS/UEFI firmware version and regional keyboard layout — always treat the result as a starting point subject to field verification by the examiner.
At the bottom of the device detail, a handoff note reads: "Once the target machine has booted into the Linux environment, this app's role is complete. Launch LLIMAGER* Linux on the target machine."*
After Handoff: Acquiring in LLIMAGER Linux
Once the target machine has booted into the live Linux environment and LLIMAGER Linux has launched:
- Manually enter case metadata (Case, Evidence, Agent, Case ID, Notes).
- Select the source device to be imaged (identified using Linux device naming, e.g.,
/dev/sda). - Select the destination path for the resulting image.
- Confirm the acquisition format (E01 via
ewfacquirerecommended; DD viaddrescueas a fallback for damaged/unstable disks) and hash settings — these should match what was configured in Tab 3, if the config file was applied. - Review and start the acquisition. Progress is displayed as the image is written.
- Upon completion, LLIMAGER Linux generates a signed, tamper-evident PDF acquisition log with embedded QR code, matching the format produced by LLIMAGER-win.
Note: anchoring the report's hash to the LLSmartVerify blockchain is not performed by LLIMAGER Linux or LLIMAGER-win directly — it happens through the LLSmartVerify Portal, typically after the report's QR code is scanned and registered via the LLIMAGER Companion mobile app. This is the same anchoring path used for Disk Image and Targeted Collection acquisitions.
BitLocker-Protected Disks
If the source disk is BitLocker-protected, image it in its raw, still-encrypted state first. Apply the recovery key later during analysis rather than unlocking the drive on-site.
License requirement: Dead Box is available only under a Standard license. Under a Trial or Portal-Trial license, selecting Dead Box from the Home screen displays a message stating the feature requires a Standard license, rather than silently disabling the icon. See Licensing.